<!-- .slide: class="title" --> # Deploying The Server ## Cloud deployment --- <!-- .slide: class="content" --> ## Run Velociraptor on your machine Download Velociraptor from GitHub (.msi or .exe) ```text "C:\program files\Velociraptor\Velociraptor.exe" gui ``` --- <!-- .slide: class="full_screen_diagram small-font" --> ## Run Velociraptor on your machine The "gui" command creates an instant temporary server/client with self signed SSL and a hard coded admin/password. <img src="../../modules/gui_tour/velociraptor-gui.png" class="mid-height"> --- <!-- .slide: class="content" --> ## Self Signed SSL mode * Frontend served using TLS on port 8000 (connected to clients) * GUI uses basic authentication with usernames/passwords. * GUI Served over loopback port 8889 (127.0.0.1) * By default not exposed to the network * You can use SSH tunneling to forward the GUI --- <!-- .slide: class="content" --> ## Steps to deploy Velociraptor 1. Provision a VM in the cloud * Configure DNS (static or dynamic) * Configure OAuth2 SSO 2. Generate configuration files 3. Build debian packages and install 4. Build MSI packages for Windows 5. Deploy via GPO/SCCM etc. * The instructor will demonstrate step 1. See the workshop setup document for credentials. --- <!-- .slide: class="full_screen_diagram" --> ### Setting Dynamic DNS with Google Domains  --- <!-- .slide: class="full_screen_diagram small-font" --> ### Configuring Google OAuth2 Requires a new project and a consent screen **NOTE**: Do not add an application logo or require more permissions - Google will require OAuth verification which can take weeks!  --- <!-- .slide: class="full_screen_diagram small-font" --> ### Generate OAuth client credentials. Note you can have multiple credentials and multiple domains in the same GCP project.  --- <!-- .slide: class="full_screen_diagram small-font" --> ### Generate OAuth client credentials. * The redirect URL is the url which Google will use to call back to Velociraptor with the user’s successful login. Note the client id and secret - we will need to provide it in the server config. It must be `https://<domain>/auth/google/callback` <img src="oauth_redirect_url.png" class="mid-height"> --- <!-- .slide: class="full_screen_diagram small-font" -->  --- <!-- .slide: class="content small-font" --> ## Installing a new server Use the password provided in the Workshop setup to log into the server. 1. Fetch the latest Velociraptor Windows and Linux release binaries 2. Create a new configuration: ``` velociraptor config generate -i ``` 3. Create a new server debian package ``` velociraptor --config server.config.yaml debian server ``` --- <!-- .slide: class="content small-font" --> ## Installing a new server Push the debian package to the server using scp ``` scp velociraptor_server*.deb mike@123.45.67.89:/tmp/ ``` Install package ``` sudo dpkg -i velociraptor_server*.deb ``` --- <!-- .slide: class="full_screen_diagram small-font" --> Generate new configuration with the details in the Workshop setup document. 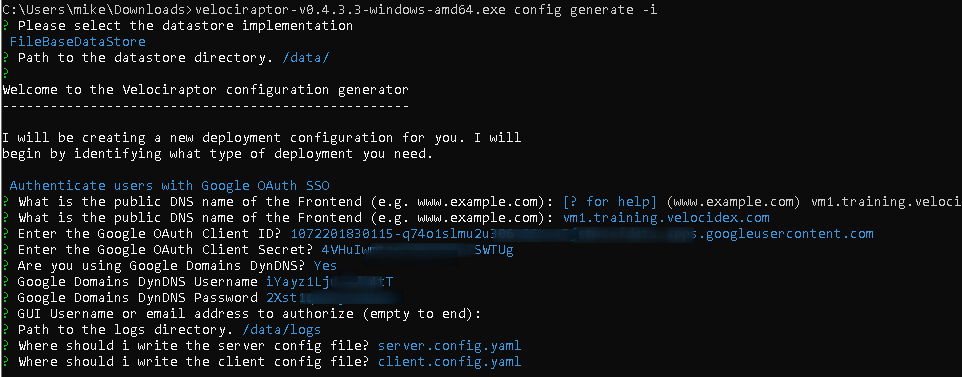 --- <!-- .slide: class="content optional" data-background-color="antiquewhite" --> ## Automating config generation Some people want to automate the config generation step. Velociraptor supports a JSON merge for non interactive configuration generation ``` velociraptor config generate --merge '{"autocert_domain": "domain.com", "autocert_cert_cache": "/foo/bar"}' ``` --- <!-- .slide: class="content small-font" --> ## Building a server deb package ``` ./velociraptor-v0.7.0-windows.exe --config ~/server.config.yaml debian server --binary velociraptor-v0.7.0-windows.exe ```  --- <!-- .slide: class="content small-font" --> ## Deploying the server * scp the deb file to the target server ``` sudo dpkg -i velociraptor_0.7.0_server.deb ```  --- <!-- .slide: class="content small-font" --> ## Deploying the server When installing the deb package you might need to install dependencies by using `apt-get install -f` 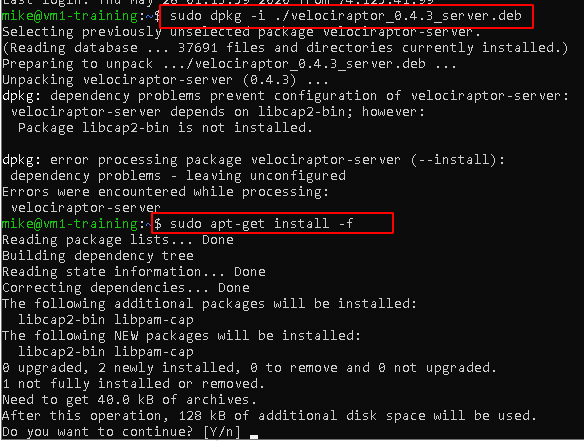 --- <!-- .slide: class="full_screen_diagram small-font" --> ### Deploying the server * The service adds a new velociraptor user to run under. * You can now access the Velociraptor server using your browser. 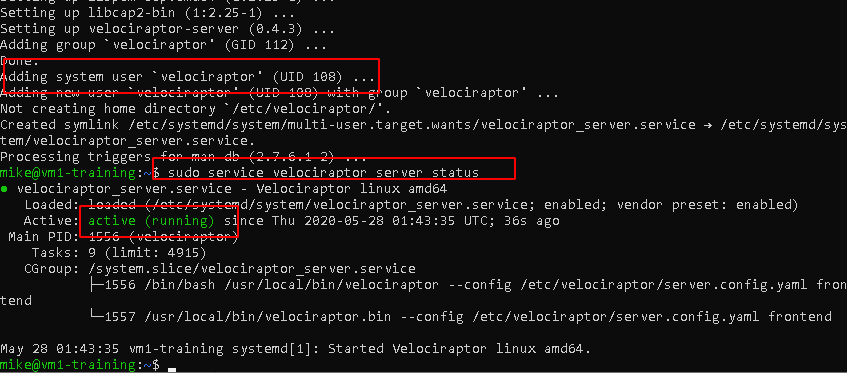 --- <!-- .slide: class="full_screen_diagram small-font" --> ### Deploying the server The first time you navigate to the SSL URL the server will obtain a certificate from Let's Encrypt. There will be a small pause as this happens.  --- <!-- .slide: class="full_screen_diagram small-font" --> ### Deploying the server You will be redirected to Google for authentication - Velociraptor does not handle any credentials in this configuration. Google will determine if the user authenticated properly (2 FA etc) and convey simple info like the user’s email address and avatar. <div style="text-align: center;"> <img src="google_oauth.png" class="mid-height" > </div> --- <!-- .slide: class="full_screen_diagram" --> ## Your Velociraptor is ready to use! 